

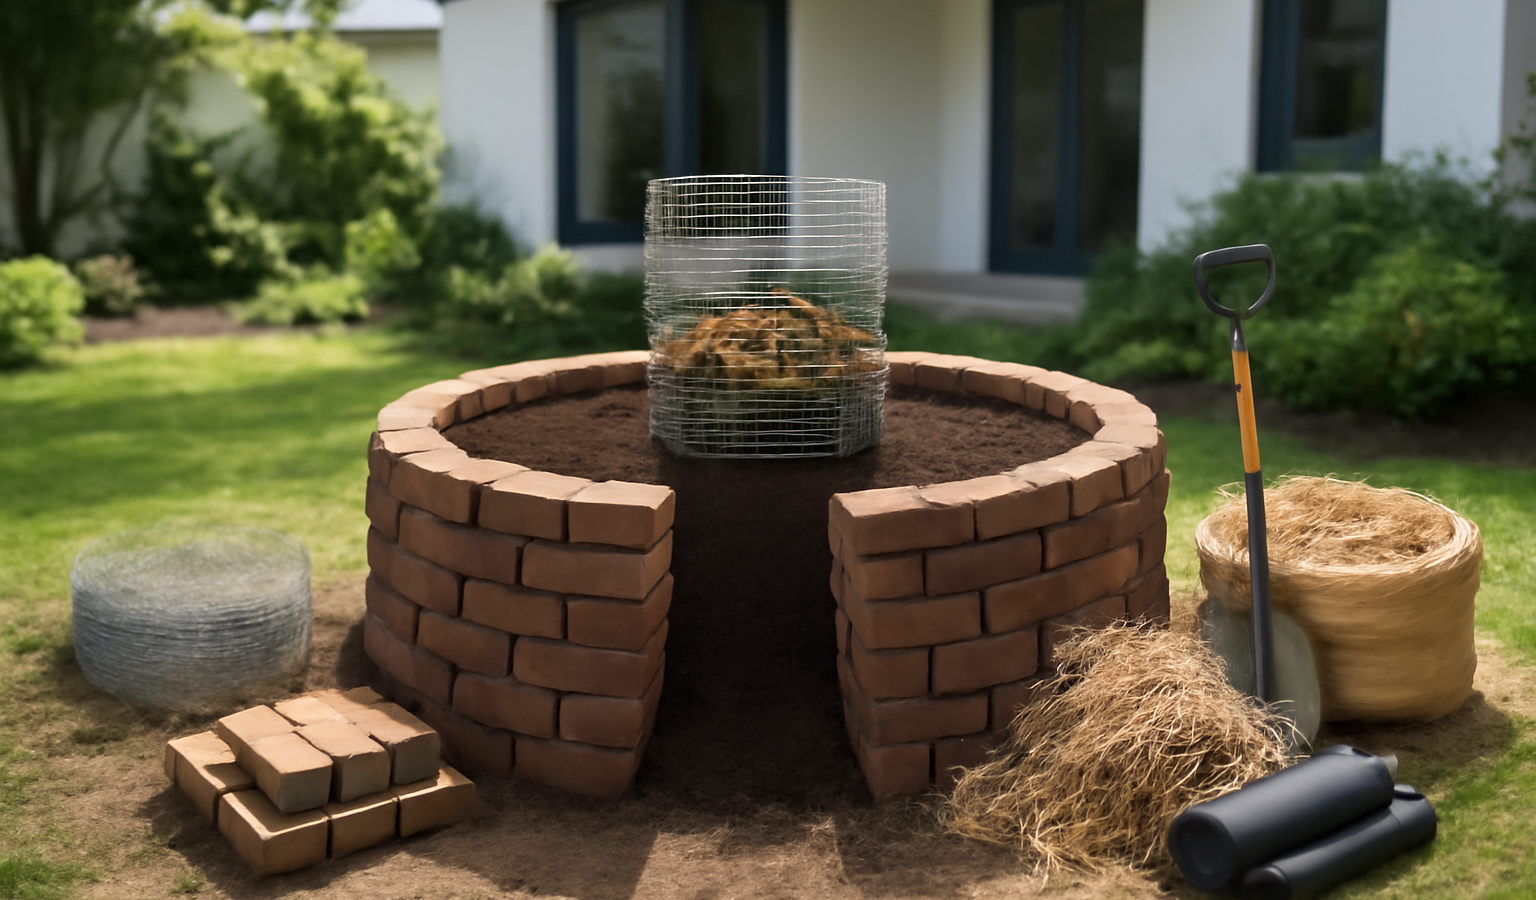
A keyhole garden is a round, waist-high raised bed with a wedge-shaped notch cut into one side and a compost basket standing in the middle. Seen from above it looks like an old-fashioned keyhole, which is where the name comes from. The design came out of Lesotho and other parts of southern Africa in the late 1990s, where aid organizations needed a bed that could feed a family on poor soil with very little water. Two decades on, it has become a favorite among urban gardeners in the United States for exactly the same reasons: it concentrates fertility, holds moisture through dry spells, and brings the growing surface up to a height that is easy to reach without bending. This guide walks you through every dimension, material, and step to build one that lasts.
Key Takeaways
- A keyhole garden is a circular raised bed roughly 6 feet across and 36 inches tall, with a central compost basket and a notch that lets you reach the middle.
- The basket feeds the bed: kitchen scraps and gray water go in the center and leach nutrients and moisture outward through the soil.
- Build the wall from stone, brick, cinder block, corrugated metal, or wood — anything that holds a curved retaining wall about waist high.
- Fill it in layers, lasagna-style: coarse material at the bottom, then carbon, then nitrogen-rich matter, capped with 8–12 inches of compost-rich topsoil.
- The closed, moisture-retaining system uses far less water than a flat row garden, making it ideal for hot, dry, or drought-prone climates and small urban lots.
What a Keyhole Garden Is and Why It Works
Picture a circle about 6 feet in diameter. The outer wall rises to roughly waist height — 36 inches is typical. A single wedge is cut out of the circle from the edge to the center, wide enough to walk into, and at the heart of that wedge sits a vertical basket made of wire mesh or sticks, about 12 inches across, running from the ground up past the top of the soil. That basket is the engine of the whole system.
You drop kitchen scraps, garden trimmings, and household gray water — dishwater, rinse water — straight into the central basket. As that material breaks down, nutrients dissolve and migrate outward and downward into the surrounding soil, fed by every watering and rain event. The bed is essentially a doughnut of growing soil wrapped around a continuous compost feeder. Because the soil is mounded slightly higher near the basket and slopes gently toward the outer wall, water and dissolved nutrients move out to the roots rather than draining away.
Three features make it punch above its weight. First, the depth and mass of soil hold moisture, so the bed dries out far more slowly than a shallow row or a small container. Second, the compost basket supplies a steady, slow trickle of fertility, meaning you rarely need to add bagged fertilizer. Third, the waist-high wall and the access notch make planting, weeding, and harvesting comfortable for anyone who struggles to kneel or bend — a real advantage in a small backyard or community plot. If you are weighing your options, our comparison of a raised bed versus an in-ground garden covers the broader trade-offs of building up rather than digging down.
Choosing the Right Spot
Keyhole gardens grow vegetables, so site for sun first. You want a minimum of 6 hours of direct sunlight a day, and 8 or more if you plan to grow tomatoes, peppers, or squash. Orient the notch toward the north if you can, so the gardener standing in it casts the least shade across the growing surface; in practice, orient it toward whichever side gives you the easiest path from the house or water source.
Pick reasonably level ground. A round bed on a slope is hard to fill evenly and will shed water to the downhill side. If your yard slopes, plan to level a pad first or build the uphill wall a few courses taller to compensate. Keep the bed within a hose-length of a spigot, and within easy carrying distance of the kitchen — you will be walking scraps out to the basket several times a week, and a long trek kills the habit fast. Finally, make sure the spot can take the weight: a filled 6-foot keyhole bed holds well over a ton of wet soil and will not be moved once built, so commit to the location.
Materials and Tools
For the wall
The wall is a curved, dry-stacked or mortared retaining wall, and almost any masonry material works. Choose based on what you can source cheaply:
- Stone or fieldstone: the traditional choice, free if you have it, and it looks the part. Dry-stack it with the heaviest, flattest stones at the base.
- Cinder block or concrete block: fast and stable; roughly 4 courses of standard 8-inch block reaches 32 inches. You can plant herbs in the block cavities.
- Brick or reclaimed pavers: tidy and uniform; plan on mortar above three courses for a curved wall this tall.
- Corrugated galvanized roofing or stock-tank panels: lightweight and quick, held in a circle by stakes — a popular Texas variant. If you go metal, our notes on a galvanized versus cedar raised bed explain how the two materials behave over time.
- Wood: use rot-resistant cedar or, for a curved wall, flexible boards or short logs set on end. Avoid old treated lumber around edibles.
For the basket and fill
- About 6 feet of galvanized hardware cloth or welded wire mesh (1/2- to 1-inch grid) to roll into a 12-inch-diameter cylinder, or a bundle of straight sticks to weave a basket.
- Zip ties or wire to close the basket cylinder.
- Cardboard and newspaper (no glossy print) to line the base.
- Coarse bottom layer: small branches, twigs, dry corn stalks, or wood chips.
- Carbon layer: straw, dry leaves, shredded paper.
- Nitrogen layer: grass clippings, green garden waste, kitchen scraps, aged manure.
- Topsoil and finished compost — enough to cap the bed with 8–12 inches; a 6-foot bed swallows roughly 1.5 to 2 cubic yards of fill in total.
Tools
- Stake and string to scribe the circle, tape measure, level.
- Spade and a wheelbarrow.
- Tin snips or wire cutters for the mesh; gloves.
- Rubber mallet for seating block or stone; a hose for wetting layers as you fill.
Step-by-Step: Building the Keyhole Garden
Step 1 — Mark out the circle and notch
Drive a stake at your chosen center point. Tie a string to it and measure out 3 feet, which gives a 6-foot-diameter bed. Walk the string around, marking the circle with flour, spray paint, or a trickle of sand. Then mark the access notch: a wedge running from the outer edge to the center, about 24 inches wide at the rim, narrowing toward the basket position. This is where you will stand to tend the middle of the bed.
Step 2 — Prepare the ground
Mow or scalp any grass inside the circle and rake it level. You do not need to dig the whole footprint out — the cardboard layer will smother the grass — but knock down high spots so the first course of wall sits flat. If the ground is badly uneven, skim off the high side until the base is level all the way around.
Step 3 — Set the central compost basket
Roll the hardware cloth into a cylinder about 12 inches in diameter and tall enough to finish a few inches above the eventual soil surface — so 40 inches or more of mesh for a 36-inch wall. Fasten the seam with wire or zip ties. Stand the basket dead center, at the inner tip of the notch, and push the bottom edge an inch or two into the soil so it stays put. Check it is plumb with a level. This basket must remain accessible from the notch for the life of the bed, so position it deliberately.
Step 4 — Build the outer wall
Lay your first course along the marked circle, leaving the notch open. Keep the base course wide and stable — for dry-stacked stone, batter the wall slightly inward as it rises so it leans into the soil load. Build up course by course to about 36 inches, checking level frequently and staggering joints in block or brick so seams do not stack. Carry the wall along both sides of the notch so the access wedge has finished edges. If you are mortaring, let the wall cure before filling. For a metal-panel build, set the panel in a circle and drive stakes inside and out every couple of feet to hold the curve against the fill pressure.
Step 5 — Line the base and add the bottom layer
Lay cardboard and a thick pad of newspaper across the whole floor of the bed, overlapping the pieces and lapping them up against the inside of the wall. This smothers grass and weeds and rots down into the soil. On top of the cardboard, spread 4–6 inches of coarse material — twigs, small branches, wood chips, dry stalks. This bottom layer creates drainage and air space and breaks down slowly to feed the bed for years.
Step 6 — Build up the lasagna fill
Now layer like a compost lasagna, alternating carbon and nitrogen and wetting each layer with the hose as you go so the whole mass is damp but not soggy. A typical sequence: coarse brush, then straw or dry leaves, then a green layer of grass clippings and kitchen waste, then a layer of aged manure or finished compost, repeating until you near the top of the wall. Keep the fill mounded slightly higher around the central basket and sloping gently down toward the outer wall — this dome shape is what carries water and nutrients outward from the center.
Step 7 — Cap with planting soil
Finish with 8–12 inches of good topsoil blended roughly half-and-half with finished compost. This is the layer your seeds and transplants root into, so make it the best soil you have. Rake it smooth, keeping the gentle slope from basket to rim. Water the whole bed thoroughly and let it settle for a few days; top up any low spots before planting, because freshly filled beds always sink an inch or two as the organic layers compress.
Step 8 — Charge the basket
Start the central basket working by filling it with a mix of browns and greens — straw, scraps, a shovel of finished compost or aged manure to seed the microbes. From here on, the basket is your ongoing compost feeder: add kitchen scraps and garden waste to it continuously, and pour household gray water or your watering can into it so moisture and nutrients spread outward through the bed.
Planting and Ongoing Care
A 6-foot keyhole bed gives you roughly 25 square feet of planting surface — enough to feed a couple or supplement a family. Plant intensively, close-spaced like a square-foot garden, with taller crops toward the center-back and trailing or low crops near the rim. Leafy greens, herbs, bush beans, chard, kale, lettuce, onions, and compact tomatoes and peppers all do well. For dense planting layouts that suit this bed, see our guide to square-foot versus row gardening.
Watering is mostly done through the basket: pour water in there and it wicks outward. In the hottest stretches of summer, water the soil surface directly too, but you will be surprised how little the bed needs once the deep fill is moisture-charged. Keep feeding the basket year-round — it never stops composting — and once or twice a season, fork a few inches of the dark, finished compost from the bottom of the basket out onto the surrounding soil as a top-dress. Refresh the bed each spring with a couple of inches of compost over the surface, since the organic fill continues to shrink as it breaks down. With this rhythm, a well-built keyhole garden stays productive for many years with almost no bought inputs.
Common Mistakes to Avoid
The most common error is making the wall too tall to reach across comfortably — anything over a 6-foot diameter and you cannot reach the basket from the notch without trampling the bed. Keep it to roughly 6 feet across. The second is skimping on the coarse bottom and carbon layers and filling the whole thing with topsoil; that is expensive, drains poorly, and starves the bed of the slow-release organic matter that makes the design work. The third is letting the basket dry out or sit empty — an idle basket is just a hole, so keep it fed and watered. Finally, do not build on unleveled ground without correcting it first; a tilted round bed sheds water and looks worse every season.
Frequently Asked Questions
How big should a keyhole garden be?
The standard is about 6 feet in diameter and 36 inches tall, with a 12-inch central basket. Six feet is the sweet spot because it lets you reach the center basket from the access notch without stepping on the soil. Going wider makes the middle unreachable; going much smaller wastes the efficiency of the design.
What do you put in the center basket?
Kitchen scraps, garden trimmings, grass clippings, dry leaves, and a starter shovel of finished compost or aged manure. Treat it like a continuous compost bin. You also pour water and household gray water into it, which carries dissolved nutrients out into the surrounding soil to feed your plants.
How much water does a keyhole garden need?
Far less than a conventional flat bed. The deep, moisture-holding fill and the central watering basket mean you can often water just two or three times a week even in summer, mostly by pouring into the basket. That water efficiency is exactly why the design spread through dry regions of Africa and the American Southwest.
What can I grow in a keyhole garden?
Most vegetables and herbs: leafy greens, lettuce, kale, chard, onions, bush beans, carrots, herbs, and compact tomatoes and peppers. Plant intensively and close-spaced like a square-foot garden. Put taller crops toward the center and trailing or low crops near the rim so nothing shades out its neighbors.
How long does a keyhole garden last?
A well-built bed with a solid wall lasts many years — the masonry is permanent and the soil only gets better as the basket keeps feeding it. Expect the organic fill to settle each year, so top up with a couple of inches of compost every spring and periodically spread finished compost from the bottom of the basket across the bed.