

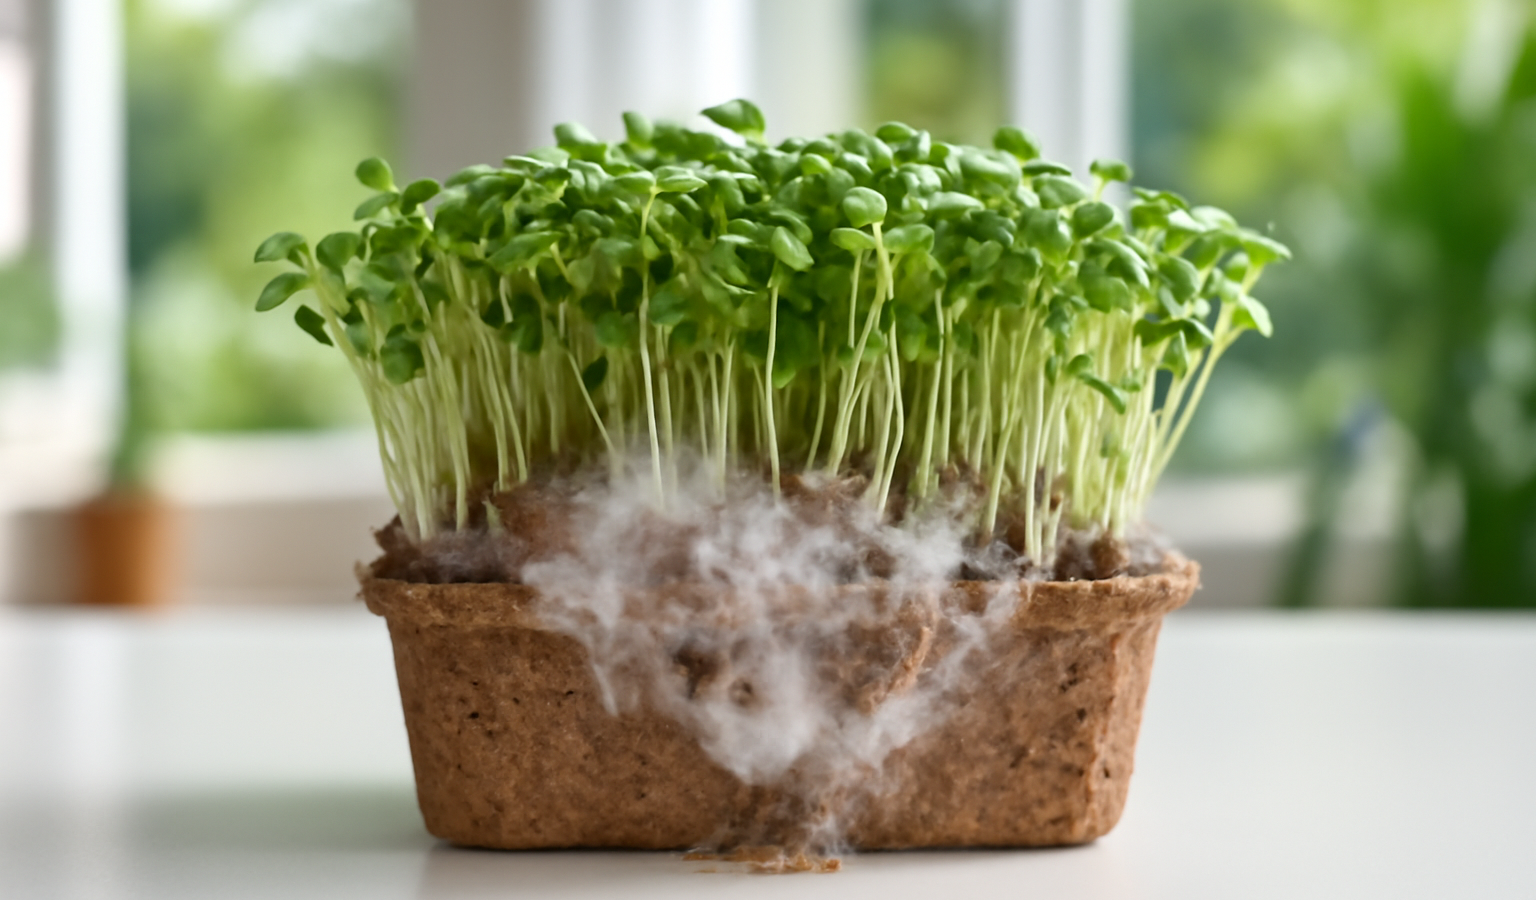
Before you toss that tray, let’s settle the question that trips up almost every new microgreens grower: is that white fuzz actually mold, or is it harmless root hairs? The two look alike at a glance, and panicking over root hairs has sent countless perfectly good trays to the compost bin. Once you can tell them apart, the real causes of mold are short and fixable: stagnant humid air, seeding too thick, sitting water, dirty gear or contaminated seed, and a room that runs too warm. Get those five things right and you’ll grow clean, dense trays week after week.
Mold on microgreens is frustrating because it shows up at the worst time, usually during the blackout or just after you uncover the tray, right when the crop should be taking off. The good news is that mold is almost never a mystery. It is a moisture-and-airflow problem nearly every time, and the variables that drive it are completely within your control. This guide walks through how to diagnose what you’re seeing, then fixes each cause with concrete numbers: seeding rates per standard 1020 tray, a fan schedule, water timing, and a peroxide soak you can do tonight.
Key Takeaways
- Root hairs are uniform, sit only at the base of stems near the soil, and vanish when you mist them. Mold is cobwebby, climbs onto stems and leaves, and has a musty smell.
- Poor airflow and trapped humidity are the number one cause. Run a small fan and stop leaving the lid on too long after germination.
- Seeding too thick starves the canopy of air. Use roughly 1 oz broccoli/radish, 1 to 1.5 oz pea, and 1 to 1.5 cups of sunflower per 1020 tray.
- Bottom water, never top water once the seeds have germinated, and never let the tray sit in standing water.
- Keep the grow area at 65 to 75F. Mold thrives above 75F with high humidity. Soak mold-prone seed in 3% hydrogen peroxide diluted 1:1 with water before planting.
First: Is It Mold or Root Hairs?
This is the single most important thing to get right, because the fix for a moldy tray is completely different from doing nothing at all, which is exactly what root hairs call for. Root hairs are a normal, healthy part of the root system. They are tiny white filaments that the roots push out to grab moisture, and they appear most often when the surface of your growing medium gets a little dry between waterings. They are everywhere new growers see “mold” and assume the worst.
Here is how to tell them apart, and you can usually do it in under a minute. Root hairs are uniform and fuzzy in a fine, even halo that rings each individual root or sits at the base of the stem right where it meets the soil. They do not climb. They never appear on the leaves or partway up the stems. The single most reliable test is the spray bottle: mist the suspect fuzz with a little water, wait thirty seconds, and look again. Root hairs collapse and flatten against the root, practically disappearing, because they are simply absorbing the water they were reaching for. Mist them again the next day and they may reappear, which is perfectly fine.
Mold behaves differently in three clear ways. First, it is cobwebby or spider-web-like, with strands that stretch between stems rather than hugging a single root. Second, it spreads upward and outward onto stems and leaves, not just at the soil line, and it often starts in one patch and creeps across the canopy. Third, and most telling, it smells. Healthy microgreens and root hairs smell fresh and green, or like nothing at all. Mold has a distinct musty, sour, basement-like odor. When you mist mold, it does not collapse the way root hairs do; the fuzz stays put or the water beads on top of it.
If you have confirmed root hairs, do nothing except keep your normal watering rhythm. If you have confirmed mold, read on. The cause is almost always one of the five issues below, and often more than one at once.
Cause 1: Poor Airflow and Stagnant, Humid Air
This is the leading cause of mold by a wide margin. Mold spores are everywhere, in the air and on most surfaces, and they only become a problem when the conditions let them take hold. A tray sitting in still, saturated air with the lid clamped on is a perfect mold incubator. The microgreens are transpiring moisture, the medium is damp, and with no air movement that humidity has nowhere to go.
How to diagnose it
Ask yourself a few questions. Is there any moving air in the room where you grow, or is it a closed closet, cabinet, or sealed shelf? Do you leave a humidity dome or lid on past germination? Does the mold tend to appear in the densest, most central part of the canopy where air can’t reach? Do trays at the back of a tight shelf mold more than trays at the open edge? If you answered yes to any of these, airflow is your problem. Mold that forms a ring around the perimeter of the tray edge or in the thickest middle of the canopy is a classic stagnant-air signature.
How to fix it
Add a small fan. A cheap clip-on or USB desk fan is all you need; you are not trying to create a windstorm, just gentle, constant movement across the surface of the trays. Aim it so the air glides over the tops of the canopies rather than blasting directly into one tray. A good starting schedule is to run the fan on low 16 to 24 hours a day once the trays come out of blackout, and even during blackout if your trays are weighted and covered rather than domed. If your fan has a timer, 30 minutes on and 30 minutes off around the clock works well and saves a little energy.
Just as important: take the lid or dome off on time. Most crops only need to stay covered through germination, which is usually 2 to 4 days. Leaving the dome on “to keep them happy” past that point traps humidity and is a direct invitation to mold. Once you see consistent germination, uncover the tray and let the fan do its work. If you stack trays for blackout, leave a small gap or use spacers so air can still creep between them. Spacing your trays an inch or two apart on the shelf, rather than crowding them edge to edge, also makes a noticeable difference. For more on how stretched, weak growth and poor air circulation go hand in hand, the principles in our guide on why herbs get leggy apply directly to a crowded microgreens canopy.
Cause 2: Overcrowding and Seeding Density Too High
It feels intuitive that more seed equals more harvest, so beginners almost always seed too heavily. The opposite is true past a certain point. When seeds are packed shoulder to shoulder, the stems grow into a dense thatch that air simply cannot penetrate. Trapped moisture in that thicket is mold heaven, and overcrowded seeds also compete so hard that some never germinate, leaving dead seed coats that rot and seed the whole tray with mold.
How to diagnose it
Look at your seed before planting. If the surface of the medium is completely hidden under a solid carpet of seed with no soil showing and seeds piling on top of one another, you are seeding too thick. After germination, if the base of the canopy is a wet, matted mass you can’t see through and you find ungerminated, slimy seeds underneath, density is your culprit. Mold that starts low in the canopy and spreads from the densest patches points straight at overcrowding.
How to fix it
Weigh your seed rather than eyeballing it. These are reliable starting rates for a standard 1020 tray (the 10 by 20 inch trays most growers use):
- Broccoli: about 1 oz (28 g) per 1020 tray. These small seeds spread further than you’d think.
- Radish: about 1 to 1.25 oz (28 to 35 g) per tray. Vigorous and forgiving, but still don’t pile it on.
- Pea (shoots): about 1 to 1.5 cups of pre-soaked seed, roughly 4 to 6 oz dry, in a single dense layer with the peas touching but not stacked.
- Sunflower: about 1 to 1.5 cups of soaked seed, roughly 5 to 8 oz, spread in one even layer where seeds touch but don’t pile up.
For small seeds like broccoli and radish, the goal is an even single layer where seeds are close but you can still glimpse some medium between most of them. For large seeds like pea and sunflower, one tight single layer is the rule; if seeds are stacking on top of each other, you’ve overdone it. When in doubt, seed a little lighter than you think you should. A slightly less dense tray with good airflow will out-yield a packed, moldy one every time.
Cause 3: Overwatering, Standing Water, and Top Watering
Water management is where airflow’s twin problem lives. Microgreens need consistent moisture, but a saturated medium and water pooling around the stems creates exactly the wet surface mold needs to colonize. Top watering after germination is one of the worst habits because it splashes water onto the stems and leaves, keeps the canopy wet, and physically spreads any spores already present across the tray.
How to diagnose it
Tip the tray gently. If water sloshes out of the bottom or the medium squelches and weeps water when pressed, it is too wet. If you’ve been watering from a can or sprayer over the top of growing greens, and the mold is on the leaves and upper stems rather than just the base, your watering method is feeding it. Trays sitting in a solid, undrained tray of water that never empties are a guaranteed mold and root-rot setup.
How to fix it
Switch to bottom watering as soon as your seeds have germinated and have roots reaching down. Use the standard two-tray setup: a 1020 tray with drainage holes sitting inside a solid 1020 tray with no holes. Pour water into the bottom solid tray and let the medium wick moisture up from below for 10 to 20 minutes, then pour off any water the tray didn’t absorb. Never let the tray sit in standing water indefinitely. This keeps the canopy bone dry on top, where it should be, while the roots get exactly what they need.
Water once a day for most crops, or twice on hot days for thirsty greens like sunflower and pea, but always check the weight of the tray first. A tray that still feels heavy doesn’t need water yet. The medium should stay evenly moist, never sopping and never bone dry. If you must mist during the blackout phase before roots establish, mist lightly and rely on bottom watering the moment roots appear. The same surface-moisture logic that drives mold here is what causes the pale, weak growth covered in our guide on why seedlings turn white.
Cause 4: Dirty Equipment and Contaminated Seed
Sometimes the mold isn’t about conditions at all; it rode in on your trays or your seed. Microgreens are grown at high density in warm, damp conditions, which means any contamination present at the start gets amplified fast. Reusing trays without cleaning them, or using seed not intended for sprouting and microgreens, are common hidden sources.
How to diagnose it
If you clean up your airflow and watering and certain crops or certain trays still mold while others stay clean, suspect the seed lot or the equipment. Seed that smells off, looks dusty, or is sold as bulk culinary or bird seed rather than for sprouting is a prime suspect. Trays with old, dried medium and root residue stuck in the corners carry spores from the last batch straight into the new one.
How to fix it
Clean every tray between uses. Scrub off all medium and roots, then wash with hot soapy water and sanitize with a dilute bleach solution (about 1 tablespoon bleach per gallon of water) or a hydrogen peroxide rinse, and let them dry fully. Use seed sold specifically for microgreens or sprouting from a reputable supplier, and store it cool and dry.
For mold-prone crops, especially the mucilaginous small seeds and the large soaked seeds like pea and sunflower, give the seed a pre-plant soak that knocks back surface spores. A 1:1 mix of 3% hydrogen peroxide and water for about 8 to 10 minutes works well, after which you rinse and proceed with your normal soak or plant directly. Some growers use a food-grade vinegar soak instead, roughly 1 part vinegar to a few parts water for 10 to 15 minutes followed by a thorough rinse. Either approach reduces the spore load you start with. Note that no soak overcomes bad airflow or overwatering; treat it as one layer of prevention, not a cure-all.
Cause 5: High Temperatures
Heat accelerates everything mold loves. Warm, humid air holds more moisture and lets spores germinate and spread far faster than cool air does. A grow space that drifts into the high 70s or 80s, especially in summer or near a heat source, will mold trays that would stay perfectly clean at cooler temperatures, even with decent airflow.
How to diagnose it
Put a thermometer in your grow area and watch it across the day, not just once. If it regularly reads above 75F, particularly combined with the humidity from your trays, temperature is stacking the deck against you. A telltale sign is mold problems that appear or worsen in summer and ease up in cooler months, or trays near a heat mat, radiator, or sunny window molding more than others.
How to fix it
Aim for a grow temperature of 65 to 75F. Most microgreens are happy in this range, and it is cool enough to keep mold pressure low while still allowing brisk growth. If your space runs hot, move trays to a cooler room or a basement, run the fan more aggressively to carry heat and moisture away, and keep heat mats off or unplugged once germination is done; mats are for sprouting, not for the growing phase. Avoid placing trays in direct, hot afternoon sun. Lowering temperature even a few degrees often makes the difference between a clean tray and a fuzzy one. The interplay of warmth, moisture and growth rate is a recurring theme across plant care, much like the conditions discussed in our guide on why a tomato plant isn’t growing.
How to Prevent Mold on Microgreens
Prevention is just the five fixes above turned into a routine, and once it’s a habit you’ll rarely think about mold again. Build your process around these defaults:
- Sanitize trays after every harvest and let them dry completely before reuse.
- Use quality seed sold for microgreens, and soak mold-prone seed in 1:1 hydrogen peroxide and water before planting.
- Seed to the recommended rate for each crop rather than piling it on. A single, even layer is the target.
- Uncover on time. Pull the dome or lid right after germination, usually day 2 to 4, and don’t leave it on.
- Run a fan for gentle constant airflow once trays are uncovered, 16 hours a day or more.
- Bottom water and pour off the excess; never let trays sit in standing water and never top water established greens.
- Hold 65 to 75F and keep humidity from getting trapped around the trays.
If you do find a small spot of mold mid-grow, you can sometimes save the tray by immediately improving airflow, cutting back water, and lowering the temperature, and some growers mist the spot with diluted hydrogen peroxide. But if mold is widespread, smells strongly musty, or has colonized the canopy, compost the tray. Microgreens are eaten raw, often within days of sprouting, so it is never worth risking eating a moldy crop. They grow fast and cheaply; start a fresh tray with your corrected routine and move on. For more growing guides and troubleshooting like this, browse our Plants & Flowers hub.
Frequently Asked Questions
Is the white fuzz on my microgreens mold or root hairs?
Mist it with water and watch. Root hairs are a fine, even halo right at the base of the stems and roots, and they collapse and disappear when wet. Mold is cobwebby, spreads onto stems and leaves, has a musty smell, and does not flatten when misted. When in doubt, smell it: fresh and green is fine, musty and sour is mold.
Can I eat microgreens that had mold on them?
No. If the tray has confirmed mold, especially widespread or strong-smelling mold, compost it rather than eat it. Microgreens are eaten raw, so there is no cooking step to make them safe. A tiny isolated spot caught very early can sometimes be cut away while you fix airflow and watering, but err on the side of starting a fresh tray.
How much seed should I use per 1020 tray?
As a starting point: about 1 oz of broccoli, 1 to 1.25 oz of radish, 1 to 1.5 cups of soaked pea, and 1 to 1.5 cups of soaked sunflower per 10 by 20 inch tray. Small seeds should form an even single layer; large seeds should touch but not stack. Seeding too thick blocks airflow and is a leading cause of mold.
Does hydrogen peroxide stop microgreens from molding?
A 1:1 soak of 3% hydrogen peroxide and water for 8 to 10 minutes before planting reduces the surface spores you start with, which helps a lot with mold-prone crops. But it is only one layer of defense. If your airflow is poor, your seeding is too dense, or you overwater, peroxide alone will not keep the tray clean. Fix the conditions too.
What temperature is best to prevent mold on microgreens?
Aim for 65 to 75F. Mold thrives above 75F when humidity is high, so a cooler room dramatically lowers your mold risk. Keep heat mats off once germination is finished, move trays out of hot afternoon sun, and run a fan to carry away heat and moisture. Even a few degrees cooler often makes the difference.