

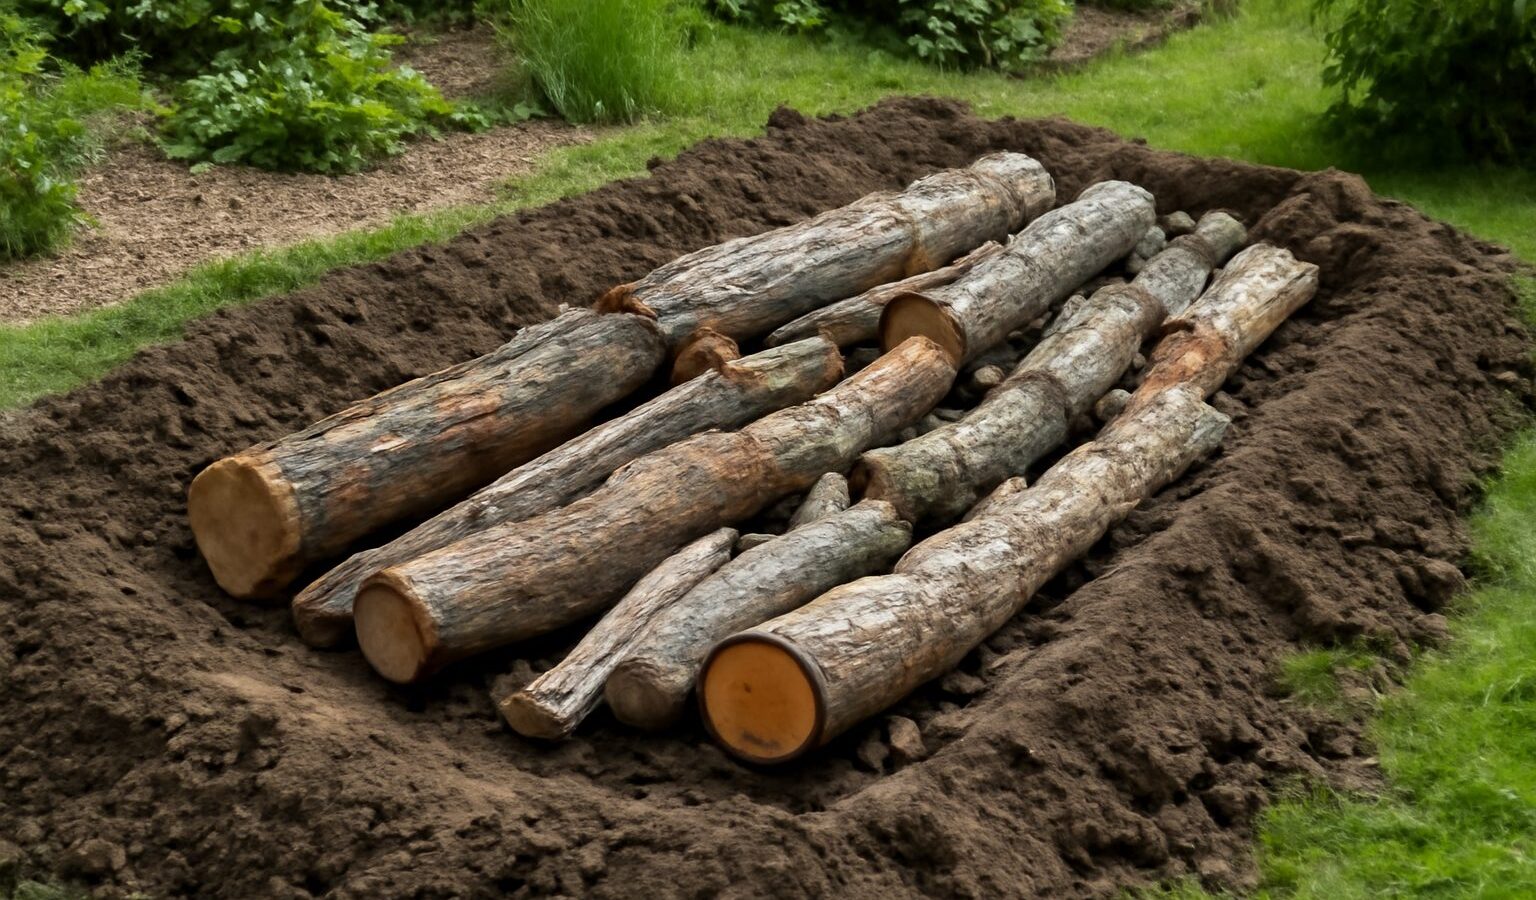
Hugelkultur — German for “mound culture” or “hill culture” — is a centuries-old way of building a raised bed over a buried core of rotting wood. As the logs and branches break down underground, they turn into a giant sponge that holds water through dry spells and slowly releases nutrients and warmth into the soil above, so an established hügel bed can go weeks without irrigation. It’s one of the most satisfying projects in permaculture: you take the woody waste most gardeners haul away — fallen logs, prunings, brush — and bury it to power years of fertility. This guide covers exactly how a hügelkultur bed works, which woods to use and which to avoid, the layer-by-layer build with sizing details, the first-year nitrogen trade-off to plan around, and what to plant on top.
In this guide
Key Takeaways
- Buried wood = a water battery: Decomposing logs act like a sponge, soaking up rain and releasing it slowly so the bed self-waters once established.
- Build it tall: A mound 2–3+ feet high settles, holds more water, and gives you more planting surface on its slopes.
- Wood choice matters: Use well-rotted hardwoods and avoid allelopathic or rot-resistant woods like black walnut, cedar, and black locust.
- Mind the first-year nitrogen dip: Fresh wood pulls nitrogen as it starts to decay, so add nitrogen-rich material and feed heavy feeders the first year.
- Layer like lasagna: Logs, then branches and brush, then sod, compost, manure, and finished with several inches of topsoil and mulch.
- It improves with age: A hügel bed peaks in years two through five as the wood breaks down, fertility climbs, and watering needs drop.
How a hugelkultur bed works
The whole principle rests on what happens to wood underground. Buried logs become colonized by fungi and bacteria that slowly digest the cellulose, and in the process the wood behaves like a massive sponge — it absorbs and stores rainfall and irrigation, then wicks that moisture back up into the root zone as the surrounding soil dries. This is why a mature hügel bed needs little to no watering even in summer; the buried wood is a built-in reservoir. The decomposition also generates a gentle warmth, much like a compost pile, which can extend your growing season at both ends, and it steadily releases nutrients as the wood breaks down into rich, crumbly humus.
There’s a catch in the early going. Fresh, undecayed wood has a very high carbon-to-nitrogen ratio, and the microbes breaking it down draw nitrogen from the surrounding soil to do their work. That means a brand-new hügel bed can temporarily lock up nitrogen near the wood, starving hungry plants in the first season. The fix is to use partly rotted wood where you can, pack nitrogen-rich material (manure, grass clippings, compost) into the build, and either plant light feeders or fertilize the first year. By the second year the balance flips and the bed becomes a fertility engine.
Best and worst woods to use
Not all wood is suitable. The ideal core is well-aged, already-rotting hardwood, which decomposes at a steady pace and holds water best. Fresh wood works too but takes longer and demands more nitrogen up front.
Good woods
- Oak, maple, birch, beech, poplar, alder, apple, and most fruit woods — reliable hardwoods and softer woods that rot at a useful rate.
- Already-decaying logs and stumps — the more punky and crumbly, the better; they hold water immediately and won’t tie up as much nitrogen.
- Willow and cottonwood — fine once dead and dry, but note fresh willow can resprout, so let it dry out first.
Woods to avoid
- Black walnut — releases juglone, a natural herbicide that poisons many garden plants. Never use it.
- Cedar, redwood, juniper, and black locust — too rot-resistant; they’re prized for fence posts precisely because they refuse to decompose, so they won’t break down or hold water well.
- Eucalyptus and camphor laurel — allelopathic and slow to rot; they can suppress plant growth.
- Any pressure-treated, painted, or stained lumber — leaches chemicals into your soil. Use only natural, untreated wood.
Pine and other conifers are usable in the deeper core if that’s what you have — they’re slightly acidic and slower to rot, so keep them toward the bottom and mix in hardwood and plenty of nitrogen-rich material above.
Sizing and siting the mound
Hügel beds work better the bigger they are, because more buried mass means more water storage and more decomposition warmth. A classic mound is built tall — original designs ran up to 6 feet high — but a practical home-garden hügel of 2 to 3 feet tall, 3 to 5 feet wide at the base, and as long as you like is plenty effective and far easier to manage. Build taller than your target finished height, because the mound settles significantly in the first year as the wood compacts and the soil sinks in. The steep sides aren’t wasted space — they’re extra planting surface, and orienting the long axis to make the most of sun lets you plant sun-lovers on the south slope and shade-tolerant crops on the north.
You can build a hügel directly on top of the ground (the simplest method) or dig a shallow trench first and set the wood partly below grade, which gives a lower, more stable profile that dries out less on the surface — a good choice in hot, arid climates. On a slope, run the mound along the contour so it slows and captures runoff. Don’t site a tall hügel right against a fence or building where you can’t reach the far side, and leave a path on at least one side for harvesting. For small yards, a compact 2-foot hügel makes an excellent self-watering raised bed; see our Urban Gardening hub for more space-efficient bed ideas.
How to build a hügelkultur bed: the layers
Building a hügel bed is essentially stacking material from coarse and woody at the bottom to fine and fertile on top — think of it as a giant buried lasagna. Here’s the layer-by-layer process:
- Clear and (optionally) dig. Mark out the footprint. To build below grade, dig a trench 6–12 inches deep and set the removed soil aside — you’ll use it later. To build on top, just mow or scalp the grass.
- Lay the big logs. Place your largest logs and stumps down first as the core, packing them fairly tightly along the length of the bed. This bottom layer is the long-term water reservoir.
- Add branches and brush. Fill the gaps and pile on smaller branches, twigs, and woody prunings. Stomp it down to eliminate large air pockets, which otherwise cause excessive settling later.
- Invert the sod and add greens. If you dug a trench, lay the cut sod grass-side down over the wood. Add a thick layer of nitrogen-rich “greens” — grass clippings, green prunings, vegetable scraps, and especially aged manure — to feed the wood-eating microbes and offset the first-year nitrogen draw.
- Layer compost and leaves. Add finished compost, fall leaves, straw, and any other organic matter. Water each layer as you go so the whole mound starts out moist, which kick-starts decomposition.
- Cap with topsoil. Cover the entire mound with at least 4–6 inches of good topsoil (the soil you set aside, plus bought or borrowed soil and compost). This is your planting layer, so make it generous and rich.
- Mulch and shape. Top with several inches of straw or leaf mulch to lock in moisture, suppress weeds, and stop the steep sides from eroding. Pat the slopes firm. The bed is ready to plant.
The whole structure should slope steeply, like a long pyramid. Water it well, and ideally let it settle for a few weeks before planting if you have the time — but you can plant immediately into the topsoil cap if you’re eager.
What to plant on a hügelkultur bed
Your planting strategy depends on the bed’s age. In the first year, the wood is still pulling nitrogen, so favor light feeders and nitrogen-fixers, or plan to fertilize. As the bed matures, it becomes rich enough for the hungriest crops.
- First year (lower fertility): Plant legumes that fix their own nitrogen — beans, peas, clover — plus light feeders like lettuce, radish, herbs, and squash and pumpkins, which sprawl happily down the slopes and don’t mind. Nitrogen-fixers actively improve the bed for next season.
- Established beds (years 2–5): Once the wood is breaking down and releasing nutrients, plant heavy feeders — tomatoes, peppers, brassicas, corn, potatoes, and squash all thrive on a mature hügel’s moisture and fertility.
- Perennials and herbs: The long-lived, self-watering nature of a hügel suits perennial herbs, berry bushes, rhubarb, and asparagus on the more stable sections.
- By slope: Put sun-loving, drought-tolerant plants on the drier top and south-facing side, and moisture-lovers and shade-tolerant greens on the cooler, damper north slope and base.
Plant densely — the mound’s surface area and stored moisture support a lot of growth, and dense planting shades the soil and reduces evaporation further. A cattle panel arch over the top makes an excellent companion for climbing squash and beans; see our cattle panel trellis guide to build one, and our keyhole garden guide for another self-feeding raised-bed design.
Maintenance and what to expect over time
A hügel bed is low-maintenance by design, but the first year takes a little attention. Water it more than you expect early on — fresh wood hasn’t yet started soaking and wicking, so the surface can dry while the core charges up. Keep it mulched, top up the topsoil cap as the mound settles and sinks (it can lose a third of its height the first year), and add a nitrogen feed if early plants look pale and stunted, which signals the nitrogen draw at work.
From the second year on, the bed largely runs itself. Watering needs drop sharply as the buried wood becomes a saturated sponge, fertility climbs as decomposition accelerates, and the soil structure becomes loose, dark, and full of life. A well-built hügel stays productive for many years — often five to seven or more — gradually flattening as the wood fully composts, at which point you’re left with a mound of beautiful, deep humus you can spread or rebuild. It’s one of the most genuinely sustainable beds you can make: garden waste in, years of self-watering fertility out.
Frequently Asked Questions
What is hugelkultur?
Hugelkultur is a raised-bed method that buries logs and woody material under layers of compost and soil. As the wood rots, it acts like a sponge — storing water and releasing nutrients and warmth into the bed for years — so an established hügel mound needs little to no watering and steadily improves in fertility.
What wood should you not use in hugelkultur?
Avoid black walnut (it releases juglone, which poisons many plants), and rot-resistant woods like cedar, redwood, juniper, and black locust, which won’t break down. Skip eucalyptus and camphor laurel for their growth-suppressing chemicals, and never use pressure-treated, painted, or stained lumber, which leaches toxins into the soil.
Why is my new hugelkultur bed not growing well?
Most likely the first-year nitrogen draw. Fresh buried wood pulls nitrogen from the soil as microbes start to decompose it, temporarily starving heavy feeders. Add nitrogen-rich material like aged manure or grass clippings, fertilize, and plant nitrogen-fixing legumes the first year. By year two the bed releases nutrients and thrives.
How tall should a hugelkultur bed be?
A practical home-garden hügel is 2 to 3 feet tall and 3 to 5 feet wide at the base, though traditional mounds went taller. Build higher than your target finished height because the mound settles substantially — often by a third — in the first year as the wood compacts and soil sinks in.
How long does a hugelkultur bed last?
A well-built hügel bed stays productive for roughly five to seven years or more, depending on the size of the wood used — larger logs last longer. It peaks in years two through five as the wood decomposes, then gradually flattens into rich humus that you can spread or use to build a new mound.
Hugelkultur turns a brush pile into years of self-watering fertility. Choose the right wood, build the mound tall and layered from coarse logs up to rich topsoil, plan around the first-year nitrogen dip with legumes and manure, and let it mature. By the second season you’ll have a bed that waters itself, feeds heavy crops, and only gets better with age.